The ultimate handwriting app
Lesson.15 -Detailed Voice Function How-To Recording, playing, and pasting.
All-new appearance! New shape and recording tools!
With version 3, MetaMoJi Note & Share is even more practical than ever before.
Now it has Voice, an incredibly useful feature that just gets better the more you learn how to use it.
※This page is an excerpt from the August 10, 2014 edition of "flick!".
※This page is an excerpt from the August 10, 2014 edition of "flick!".
flick!
6 series of articles about MetaMoJi Note have been published In the digital gadget magazine "flick!"「flick! Digital」

Reecording sound as documentation, and recording sound as content
Have you tried the new Voice feature? With Voice, the handwritten note app has become an even more multifunctional solution. The uses for MetaMoJi Note/Share have expanded to new dimensions.
The Voice feature can be used in many situations, but there are two major ways it can be used.
The first use is for documentation. For example, when we do interviews for articles, we turn on the recording feature while taking notes. Afterwards, play back the sound that was recorded at the time the notes were taken by tapping that section of the notes. This is very useful when typing up minutes from a meeting.
Another use is to create recorded content. By pasting a voice recording on an image such as a product photo, the recording can be played back when tapped, for dynamic content creation. This is convenient for catalog descriptions and maps.
Step1 Link to some handwriting or other object and begin recording
The Voice function can be difficult to grasp just by looking. Some users may find it is difficult to figure out how to use by trial and error alone. Read this guide and gain an understanding of how to use the feature.
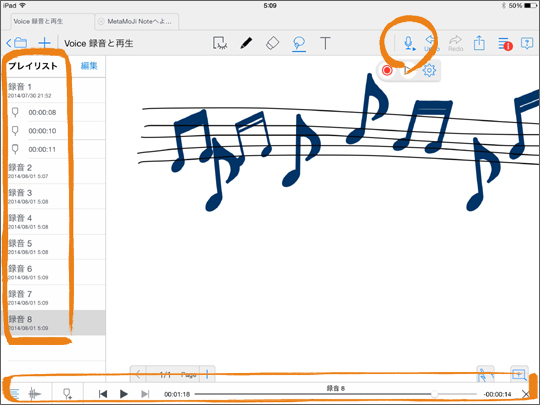
The recording button is shaped like a microphone, and located with other function buttons at the top right of the screen. The mic plays an important role so it was used for the icon design.
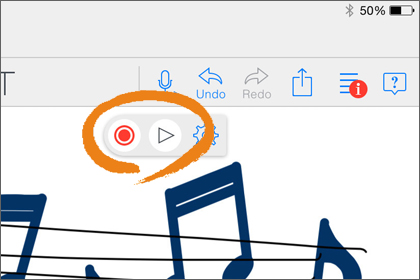
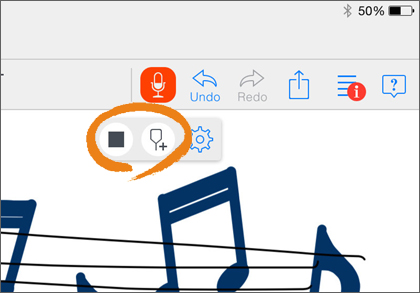
Tap the recording button and recording will begin. During recording, the mic icon will be red, and the recording button will turn into a black square "stop" button. To the right of the recording button is a chapter button, which allows the recording to be divided into chapters. When the recording is stopped, a play button appears. Push the play button and a play list and recording time bar will appear and the recording will begin to play. Push the settings button to adjust the recording quality and more.
The recording button is shaped like a microphone, and located with other function buttons at the top right of the screen. The mic plays an important role so it was used for the icon design.
Tap the recording button and recording will begin. During recording, the mic icon will be red, and the recording button will turn into a black square "stop" button. To the right of the recording button is a chapter button, which allows the recording to be divided into chapters. When the recording is stopped, a play button appears. Push the play button and a play list and recording time bar will appear and the recording will begin to play. Push the settings button to adjust the recording quality and more.
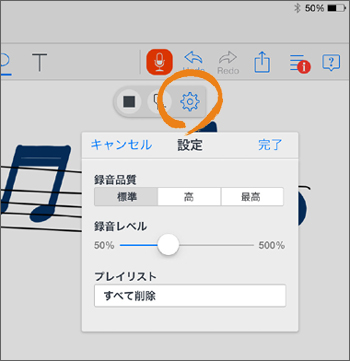
The gear icon is settings. Adjust recording quality (data volume), levels, and more.
|
|
|
| Red double circle recording button. To the right, a triangular play button. Choose a mode. | Tap the recording button and the icon turns red, and the button turns into a black square stop button. |
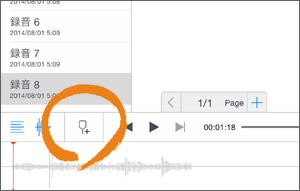
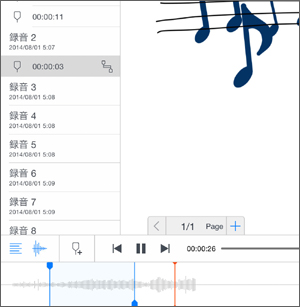
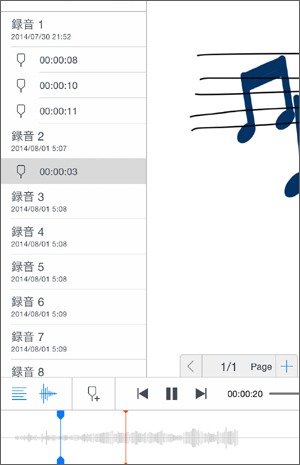
Step2 Inserting Chapters and Setting Playback Parameters
There's no explanation in the text, so this needs to be explained a bit, but Voice has a recording editing feature. Recorded sounds can be split up, and by inserting chapters and playing back from those points, the recording can be made into short clips.
With this useful feature, a long recording can be edited as necessary by making clips.
With this useful feature, a long recording can be edited as necessary by making clips.
Tap the play button, and a sound control bar appears at the bottom of the screen as well as a play list to the left. "Recording X" is created on the playlist every time the stop button is pushed.
|
|
|
||
| Push the "Chapter" button while playing back to create a chapter. This is handy when reviewing a longer piece and useful for editing as well. | Hold the chapter on the bottom edge and drag it to the right to expand the selection area. | Every time you push the chapter button, a blue "chapter" is added. |
Step3 Paste a chapter on a handwritten stroke by selecting the lasso tool and tapping the stroke
The chapters created in Step 2 can be pasted onto a designated handwritten stroke or onto text. Select the sound then push and hold the stroke. Select "Link to Current Play Position" in the context menu that appears, to link the two. Tap and select "Play from Created Time" and that point in the recording will be linked to the stroke. Push the play button and a play list and recording time bar will appear and the recording will begin to play. Push the settings button to adjust the recording quality and more.

|

|
|
| Select a part of the recording, and tap and hold the stroke you want to link it to, and select "Link to Current Play Position". | Add the link and "Play from Created Time" will appear on the context menu. Select this to play back. |